Simple Miniature Polymer Clay Animals from Basic Shapes
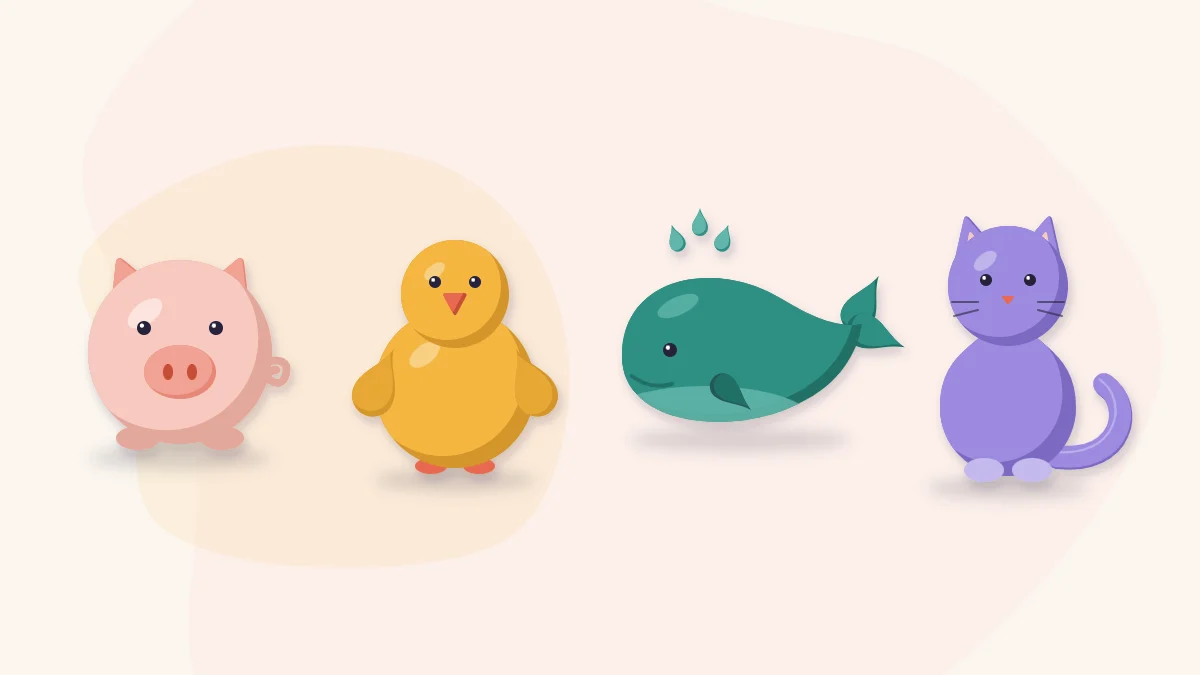
Build simple, original miniature animals from balls, teardrops and cones. A chick is the worked example, with a pig, a whale and a cat from the same parts.
Tutorial at a glance
Materials
- Polymer clay in a few soft colors
- Dark clay for eyes
- Coral or orange clay for beaks and noses
- Ball stylus
- Needle tool
- Tissue blade
- Ceramic tile
- Liquid polymer clay (optional)
- Short wire or toothpick for support (optional)
You do not need to be able to sculpt to make miniature polymer clay animals. A simple figure is really a list of parts: a big ball, a smaller ball, two teardrops, a cone. If you can roll those, you can build a chick, a pig, a whale or a cat.
The designs here are plain, rounded, original shapes with dot eyes. They are meant as a starting vocabulary, so change the proportions, colors and details until the animals are your own.
What you need
- Polymer clay in a few soft colors, such as mustard, blush, teal and lilac
- A small amount of black or dark clay for eyes, and coral or orange for beaks and noses
- A ball stylus and a needle tool
- A tissue blade for dividing clay evenly
- A ceramic tile to build and cure on
- Optional: liquid polymer clay, and short pieces of wire or toothpick for support
Condition each color well and wash your hands between colors. Pale animals show every speck of dark clay and lint.
Break the animal down into basic shapes
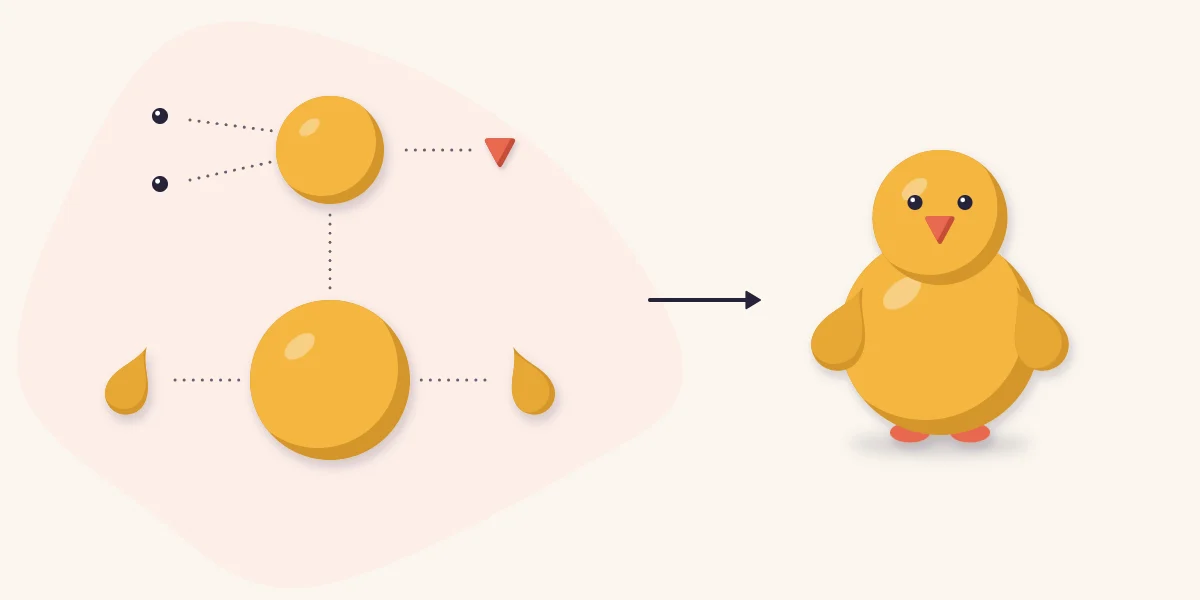
Before touching the clay, decide what each part is. For the chick the list is short: one large ball for the body, one smaller ball for the head, two small teardrops for wings, a tiny cone for the beak and two dots for eyes. Make all the parts first and lay them out on the tile in the positions they will take. You can see straight away whether the head is too big or the wings are mismatched, and fix it before anything is joined.
Proportion does most of the work. A head about two thirds the size of the body looks young and friendly. A head the same size as the body looks like a toy, and a much smaller head looks more like a real bird. None of these is wrong, but pick one on purpose. If rolling a clean teardrop or cone is still awkward, practice with the guide to basic polymer clay shapes.
Build the chick step by step
- Body. Roll a mustard ball about 1/2 inch (1.2 cm) across. Set it on the tile and press very lightly so it has a small flat spot to stand on.
- Head. Roll a second ball about two thirds that size. Press a shallow dimple into the top of the body with the ball stylus, seat the head in it and press down gently. The dimple gives the head a socket, which holds far better than two round surfaces touching.
- Wings. Roll two equal teardrops and flatten them a little. Press one onto each side of the body with the rounded end toward the front and the point angled back and slightly up.
- Beak. Roll a tiny coral ball into a short cone. Pick it up on the tip of the needle tool and press its base onto the middle of the face.
- Eyes. Mark where the eyes go with the needle tool, level with the beak or just above it. Roll two specks of dark clay, set them in the marks and press them flat.
- Blend the joins. Where a part needs more hold, drag a little clay across the seam on the hidden side with the ball stylus and smooth it.
Three more animals from the same parts
| Animal | Body and head | Added shapes | Key detail |
|---|---|---|---|
| Pig | One plump ball, or a ball with a smaller head | A flattened oval snout, two small triangle ears, four tiny ball feet | Two nostril dots pressed with the needle tool |
| Whale | One large teardrop laid on its side | Two small flattened teardrops joined at the points for the tail, two small fins | A paler belly sheet and a curved line for the mouth |
| Cat | An upright teardrop body with a ball head | Two small cones for ears, a thin log for the tail | A tiny triangle nose and whisker lines |
For the whale, curl the narrow end of the teardrop upward before adding the tail so the animal looks as if it is swimming. For the cat, wrap the tail log around the base of the body. A tail that sticks out unsupported is the first thing to snap.
Join the parts so they stay on
Parts that are only resting on each other often separate after curing. Three habits prevent that:
- Use sockets. Press a dimple wherever a round part meets another round part.
- Blend where it will not show. Smooth a little clay across the seam at the back or underneath.
- Add support for tall figures. A short piece of wire or toothpick pushed down through the head into the body keeps a heavy head from leaning. A thin smear of liquid polymer clay at the join can also help, depending on the product, so check its instructions first.
Tip
If the clay gets soft and sticky from handling, set the figure down on the tile and leave it until it firms up again. Cooler clay holds crisp edges and takes small parts without squashing.
Give the face some character
Eye placement changes the whole expression. Eyes set wide apart and low on the head look gentle. Eyes close together and high look alert or surprised. Try both on a spare ball before committing.
Keep the eyes small; oversized eyes crowd the face. For a softer look, add a tiny flattened dot of blush or coral under each eye as a cheek. Short eyebrow lines, a curved mouth or whiskers can be pressed in with the side of the needle tool, but stop early. Two dots and a beak are often enough.
Cure the animals
Cure (bake) the figures standing on the tile they were built on. Different manufacturers and product lines have different curing requirements, so read the packaging for the clay you are using and follow those instructions exactly. A loose foil tent shields ears, tails and pale colors from direct heat, and the full setup is explained in how to cure polymer clay.
Let the animals cool completely before lifting them; thin parts are most fragile while warm.
Fix common problems
- Fingerprints on round bodies: roll the ball again with very light pressure, or stroke the surface smooth with a fingertip before adding parts.
- A flat back: the figure was laid down while soft. Build it standing up.
- Cracks at the neck: the clay was under-conditioned or the join was stretched. See polymer clay troubleshooting for causes and repairs.
- Smudged eyes: add dark details last and clean your fingers afterward.
Watch out
These figures are small display pieces with parts that can break off. Keep them out of reach of young children and pets, and supervise children who are making their own.
A finished animal sits well beside miniature clay succulents in tiny pots, built from the same shapes. For more practice at this size, try miniature polymer clay food.
Frequently asked questions
What is the easiest polymer clay animal for a beginner?
A chick is a good first choice because it needs only two balls, two teardrops, a tiny cone and two dots. There are no legs or long tails to support, and the round shapes are forgiving. A pig or a whale is a sensible next step.
How do you keep the head from falling off a clay animal?
Press a shallow dimple into the body with a ball stylus and seat the head in it, so the two parts meet over a wider area. Blend a little clay across the seam at the back, and for a larger head push a short piece of wire or toothpick through both parts as a support.
How do you make tiny eyes on miniature clay animals?
Mark the positions first with a needle tool so the eyes sit level. Roll two specks of dark clay, lift each one on the needle tip, set it in its mark and press it flat. Add the eyes last so the dark clay does not smudge onto the lighter body.