How to Make Polymer Clay Charms
Shape small polymer clay charms from basic forms and set the eye pin so it stays put, using a simple mushroom as the worked example.

Tutorial at a glance
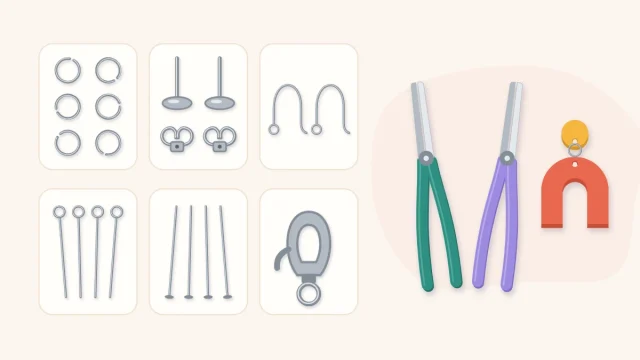
Materials
- Polymer clay in two or three colors
- Eye pins
- Jump rings
- Tissue blade
- Needle tool
- Ball stylus
- Pliers and wire cutters
- Ceramic tile
- Liquid polymer clay or glue (optional)
A charm is a small sculpted piece with a metal loop on top, and that loop is the part that decides whether it lasts. Polymer clay charms are quick to shape from balls, logs and teardrops, but a charm whose eye pin slides out after a week on a bracelet has failed, however good it looks. So this tutorial spends as much attention on the pin as on the clay.
The worked example is a small mushroom, because it uses two basic shapes and has a thick top that holds a pin well. The same method covers a moon, a leaf, a berry, a star or a rainbow arch.
What you need
- Polymer clay in two or three colors, conditioned until soft and smooth
- A tissue blade, a needle tool and a ball stylus
- Eye pins, one per charm
- Round-nose or flat-nose pliers and wire cutters
- A ceramic tile to work and cure on
- Jump rings for hanging the finished charms
- Optional: liquid polymer clay or glue for securing pins
Charms are small, so aim for a finished size of about 3/4 inch (2 cm) tall. Smaller than that and there is not enough clay around the pin to grip it.
Shape a simple mushroom charm
- Make the stem. Roll a pea-sized ball of cream or blush clay, then roll it into a short, fat log. Stand it on the tile and press down lightly so the base flattens and the charm will sit level.
- Make the cap. Roll a slightly larger ball in coral or mustard. Press it gently on the tile to form a dome with a flat underside. Keep the dome tall. A thin, flat cap leaves no depth for the pin.
- Join the two parts. Press a shallow dimple into the underside of the cap with a ball stylus, set the cap over the stem and press down just enough for the clay to grip. The dimple gives the stem a socket, which is stronger than two flat faces touching.
- Add spots. Roll tiny balls of a contrasting color, place them on the cap and press each one flat with a fingertip so it sits flush instead of perched on top.
- Check all sides. Turn the tile and look at the back. A charm swings and turns when worn, so the back gets seen.
If these shapes are new to you, practice with the ball, log, teardrop and sheet first. Nearly every charm is a combination of those four.
More charm shapes to try
| Charm | Built from | Where the pin goes |
|---|---|---|
| Crescent moon | A thick log tapered at both ends and curved | Into the upper tip, along the curve |
| Leaf | A flattened teardrop with veins pressed in by a needle tool | Into the rounded end |
| Berry | A plump teardrop with pricked seed dots and a small green star on top | Down through the leafy top |
| Star | A thick slab cut with a small cutter, edges softened | Into one point, kept central |
| Rainbow arch | Three thin logs laid side by side and bent into an arch | Into the top of the outer band |
Flat shapes such as the star need a slab at least as thick as two stacked coins. A pin pushed into a thin slab bulges out of the front or back.
Set an eye pin so it stays in
A straight, smooth wire has nothing to hold on to. Cured clay does not grip metal, so a straight pin can be pulled out with very little force. Give the wire a shape that the clay closes around.
- Trim the pin. Cut the eye pin so the straight part is a little shorter than the depth of clay it is going into. On the mushroom that means the height of the cap.
- Bend the end. Grip the last bit of wire with pliers and turn it into a small hook, or put two tight bends in it to make a zigzag. Either shape acts as an anchor.
- Insert it. Hold the charm at its sides and push the bent end straight down into the top center of the cap, twisting slightly as it goes. Stop when the loop sits just on the surface.
- Close the clay around it. Use the needle tool or a fingertip to nudge the clay back against the wire where it entered, so there is no open gap around the pin.
- Turn the loop. Decide which way the charm should face when it hangs and rotate the loop to suit before curing.
For extra hold, some makers put a small drop of liquid polymer clay on the wire before inserting it. Another approach is to cure the charm, pull the pin, and glue it back into its hole with two-part epoxy or cyanoacrylate glue. Adhesives vary in how they bond to cured clay and metal, so read the label and test on a scrap piece first.
Watch out
If the pin leaves a bump or a pale line on the front of the charm, the wire is too close to the surface. Pull it out, re-roll that part and insert the pin again through the thickest area.

Cure the charms
Leave the charms on the tile you built them on and cure (bake) them there, so you do not distort them by lifting. Each manufacturer and product line has its own curing requirements, and the only reliable source is the packaging of the clay in front of you, so follow it exactly. If you are unsure how to set up your oven, tile and thermometer, read how to cure polymer clay first.
The metal pin gets hot, so let everything cool fully before touching it. Then give the loop a gentle tug. A pin that moves now would have come loose later, and it is easy to glue at this stage.
Finish and hang the charm
Most charms need no finish. If you want shine on a berry or a mushroom cap, the article on matte, satin and gloss finishes covers the options. Whatever you choose, test it on a spare piece of the same clay first, since products behave differently.
To hang the charm, open a jump ring by twisting its ends sideways, slip it through the eye pin loop and through a chain link or bracelet, then twist it closed. The guide to jewelry findings for polymer clay explains ring sizes and why pulling a ring apart weakens it.
Tip
Make charms in batches of the same design. The second and third are always neater than the first, and matching pairs can become earrings.
Common problems
- Fingerprints on the cap: smooth the clay with the pad of a finger in light circles before curing, or handle the charm only by its sides.
- Parts falling off after curing: the pieces were only resting on each other. Press joins firmly and use a dimple or socket where you can.
- Loop facing the wrong way: add a second jump ring. Two rings in a row turn the charm a quarter turn.
- Dusty light colors: wipe your hands and tile, and work light colors before dark ones.
Frequently asked questions
How do you keep an eye pin from falling out of a polymer clay charm?
Bend the straight end of the pin into a small hook or zigzag before pushing it into the uncured clay, then press the clay back around the wire. The bend gives the clay something to close around. For more security, glue the pin after curing, testing the glue on a scrap piece first.
Do you put the eye pin in before or after curing?
Insert it before curing so the clay hardens around the bent wire. After the charm has cooled, tug the loop gently. If it moves, pull it out and glue it back into the same hole.
How big should a polymer clay charm be?
Around 3/4 inch (2 cm) is a practical size for bracelets and zipper pulls. The part that holds the pin needs to be thick enough that the wire sits well inside the clay and does not show through the surface.